
30.11.10
3D Printer in Action
'Dimension SST 1200es 3D printer prints out 2 interlocked cube frames.
"Dimension 1200es 3D Printers use ABSplus™ modeling material, a production-grade thermoplastic that is durable enough to perform virtually the same as production parts. Models are printed from the bottom up with precisely deposited layers of modeling and support material. There's no waiting for models to cure — they're ready for support removal right from the printer."'
3.9.10

7.8.10
The Quest for Realism - James Blinn, 1980
In the 80s, executing the Hide command on a large 3D file could have taken hours -- or days! Today, rendering an image is not instantaneous, but it's fast in comparison.
Here's a nice little video explaining the basics of rendering in a historical context.
Jim Blinn became widely known for his wonderful computer graphics for NASA's JPL and Carl Sagan's Cosmos -- in my opinion, the greatest science documentary in the universe.
Thank you, Joel Schlosberg!
Στη δεκαετία του 1980, η εκτέλεση της εντολής Hide σε μεγάλο 3D αρχείο μπορούσε να διαρκέσει ώρες -- ακόμα και μέρες! Σήμερα, δεν γίνεται στιγμιαία, άλλα σίγουρα πολύ πιο γρήγορα.
Βρήκα ένα ωραίο βίντεο το οποίο εξηγεί τις βασικές αρχές του φωτορεαλισμού με μια ιστορική αναδρομή.
Ο James Blinn έγινε γνωστός για τη δουλειά του με το Jet Propulsion Laboratory της NASA, καθώς και τα καταπληκτικά του γραφικά στο Cosmos του Carl Sagan, που είναι, κατα τη γνώμη μου, το πιo ωραίο επιστημονικό ντοκιμαντέρ όλων των εποχών.
Ευχαριστώ,Joel Schlosberg!
2.8.10
Ribbon: Not all or nothing
Eager to start exploring the ribbon but hesitate to give up on your trusty pull-down menu and toolbars? There's an easy win-win solution:
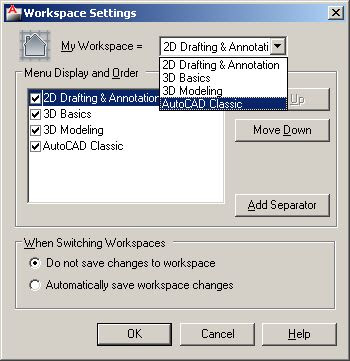
Start Autocad 2010 or 2011 and, on the Command Line, enter: wssettings.
Selecting AutoCAD Classic from the My Workspace dropdown will bring back the older, classic interface we've come to know and love.
To activate the Ribbon, enter ribbon on the Command Line. Want to get rid of it? Enter ribbonclose.
That's it! The best of both worlds!
Θέλετε να εξερευνήσετε το Ribbon αλλα δυστάζετε να στερηθείτε το παλιό, κλασσικό περιβάλλον των Pull-down και Toolbars; Υπάρχει μια εύκολη λύση!
Αρχίστε το AutoCAD 2010 ή 2011 και στη Γραμμή Εντολών, πληκτρολογήστε wssettings.
Επιλέξτε το AutoCAD Classic απο τον κατάλογο του My Workspace και θα επενέλθει το γνωστό μενού.
Για να ενεργοποιήσετε το Ribbon, στη γραμμή εντολών, πληκτρολογήστε ribbon. Θέλετε να το κλείστετε; Στη γραμμή εντολών, πληκτρολογήστε ribbonclose.
Αυτό είναι!
Start Autocad 2010 or 2011 and, on the Command Line, enter: wssettings.
Selecting AutoCAD Classic from the My Workspace dropdown will bring back the older, classic interface we've come to know and love.
To activate the Ribbon, enter ribbon on the Command Line. Want to get rid of it? Enter ribbonclose.
That's it! The best of both worlds!

Θέλετε να εξερευνήσετε το Ribbon αλλα δυστάζετε να στερηθείτε το παλιό, κλασσικό περιβάλλον των Pull-down και Toolbars; Υπάρχει μια εύκολη λύση!
Αρχίστε το AutoCAD 2010 ή 2011 και στη Γραμμή Εντολών, πληκτρολογήστε wssettings.
Επιλέξτε το AutoCAD Classic απο τον κατάλογο του My Workspace και θα επενέλθει το γνωστό μενού.
Για να ενεργοποιήσετε το Ribbon, στη γραμμή εντολών, πληκτρολογήστε ribbon. Θέλετε να το κλείστετε; Στη γραμμή εντολών, πληκτρολογήστε ribbonclose.
Αυτό είναι!
30.7.10
Dynamic Door Block
This post assumes that you know a little bit about basic dynamic block functions.
The problem: How to create a door symbol that stretches dynamically and flips horizontally and vertically. For some users, the flipping action screws up the size of the door panel, so it doesn't behave as expected. Here's a step-by-step tutorial for creating the symbol, with a special note on the detail that's the problem:
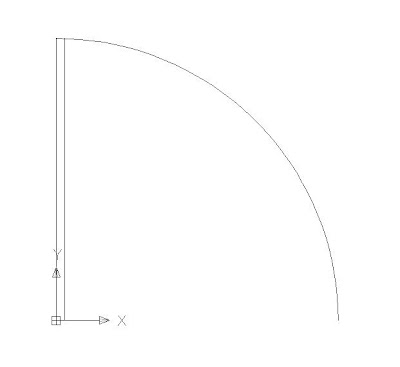
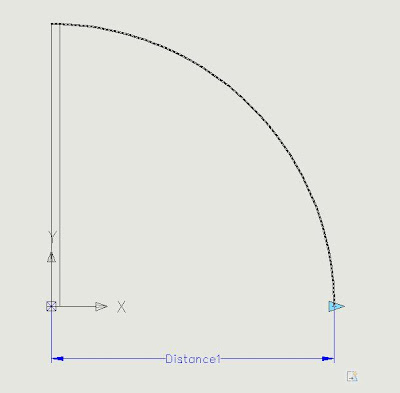
1. Draw a door symbol to preference. For brevity, mine is as simple as it gets:
2. Create the block and load it into the block editor.
The problem: How to create a door symbol that stretches dynamically and flips horizontally and vertically. For some users, the flipping action screws up the size of the door panel, so it doesn't behave as expected. Here's a step-by-step tutorial for creating the symbol, with a special note on the detail that's the problem:
1. Draw a door symbol to preference. For brevity, mine is as simple as it gets:
2. Create the block and load it into the block editor.
First, you're going to make the door stretch-able. You have to handle the door panel and the arc separately:
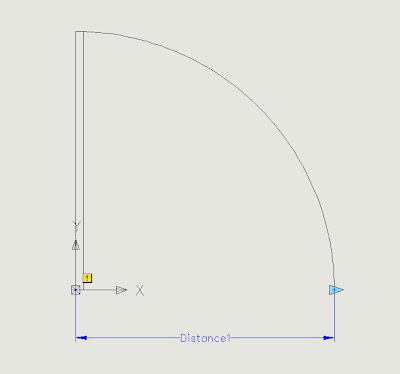
3. Add a linear parameter by hitting two points from left to the right. select the parameter, right click and hit grip display > 1. It should look like this:
4. Add a stretch action by selecting the linear parameter, hitting the red node on the right blue arrow grip, drawing a frame around the top of the door panel, and then selecting the door panel ONLY... and NOT the arc.

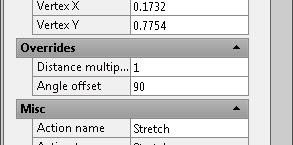
5. Select the stretch action, go to properties, find the angle offset property item under overrides, and enter 90. ( This will make the panel stretch vertically while you're stretching horizontally with your mouse.)
6. Add a scale action by selecting the linear parameter and then the arc. (This will change the size of the arc without distorting its shape.)
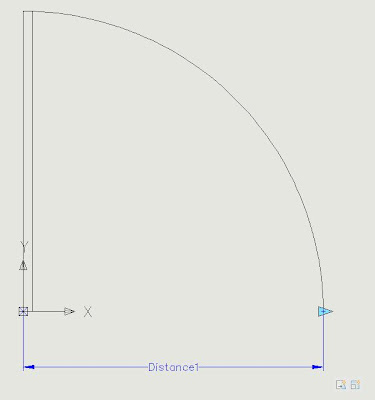
At this point, your work should look like this...
8. Add a flip action by selecting the parameter and then, at the select objects prompt, enter ALL.
NOTE: Do NOT select objects with your mouse: Make sure you type ALL. If you try both methods, you'll notice that, with ALL, you select more object than you do with your mouse.
Now we need to make sure that the flip arrow always stays in position on the symbol's centerline as you stretch. Here's how:


You're going to make sure the first arrow also flips the new one:
15. Hit the first flip action, right click, hit action selection set > modify selection set, and at the select objects prompt, select the basepoint parameter.

I didn't get into the issue of listing standard sizes for your door via the linear parameter -- but you already know how to do that, right?
Try it!
Let me know if it works -- or not -- or if I've mucked up the description somehow. I'll gladly edit.
3. Add a linear parameter by hitting two points from left to the right. select the parameter, right click and hit grip display > 1. It should look like this:
4. Add a stretch action by selecting the linear parameter, hitting the red node on the right blue arrow grip, drawing a frame around the top of the door panel, and then selecting the door panel ONLY... and NOT the arc.

5. Select the stretch action, go to properties, find the angle offset property item under overrides, and enter 90. ( This will make the panel stretch vertically while you're stretching horizontally with your mouse.)

6. Add a scale action by selecting the linear parameter and then the arc. (This will change the size of the arc without distorting its shape.)
At this point, your work should look like this...
This includes the linear parameter and the two action icons for stretch and scale (in the bottom right corner).
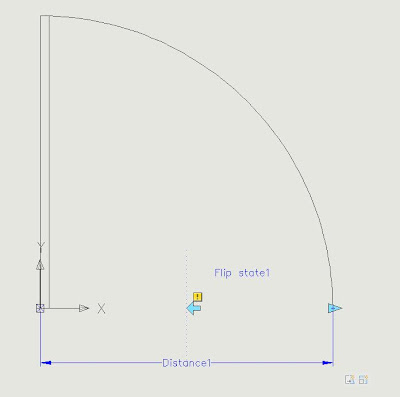
So far, so good... time to flip horizontally...
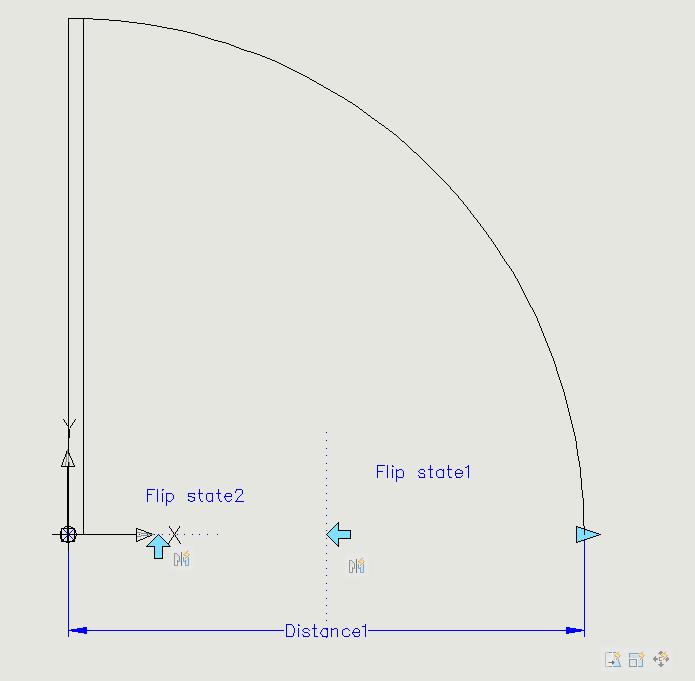
7. Add a flip parameter to the center line of the symbol.
7. Add a flip parameter to the center line of the symbol.

8. Add a flip action by selecting the parameter and then, at the select objects prompt, enter ALL.
NOTE: Do NOT select objects with your mouse: Make sure you type ALL. If you try both methods, you'll notice that, with ALL, you select more object than you do with your mouse.
I assume that the crucial difference is the two points that determine the stretch frame, which are not visible, therefore unselect-able with the mouse.

Now we need to make sure that the flip arrow always stays in position on the symbol's centerline as you stretch. Here's how:
9. Add a move action for the flip arrow. Select the linear parameter, then hit its right red arrow node, and finally select the flip parameter.
10. Select the new move action icon, hit preferences, and enter 0.5 for the distance multiplier under overrides.
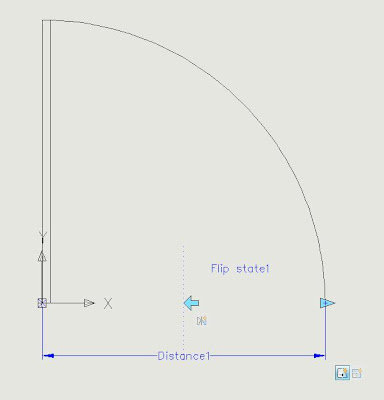
Finally, we have to make the door flip vertically...
11. Add a second flip parameter as shown in the image below.
12. Add the flip action for the new flip parameter and enter ALL in order to select all objects. it should look like this:
12. Add the flip action for the new flip parameter and enter ALL in order to select all objects. it should look like this:

You're going to make sure the first arrow also flips the new one:
13. Select the first flip action, right click, hit action selection set > modify selection set, and at the select objects prompt, select the second flip arrow parameter. This will add the second flip arrow to the original, horizontal flipping action.
14. Add a baspoint parameter to your 0,0 coordinates (the block's insertion point). This will prevent your door symbol from moving around in the wall opening as it's being flipped all over the place.
14. Add a baspoint parameter to your 0,0 coordinates (the block's insertion point). This will prevent your door symbol from moving around in the wall opening as it's being flipped all over the place.
Again, we're going to want the basepoint parameter to flip along horizontally with everything else:
15. Hit the first flip action, right click, hit action selection set > modify selection set, and at the select objects prompt, select the basepoint parameter.
I didn't get into the issue of listing standard sizes for your door via the linear parameter -- but you already know how to do that, right?
Try it!
Let me know if it works -- or not -- or if I've mucked up the description somehow. I'll gladly edit.
Εγγραφή σε:
Αναρτήσεις (Atom)